Why Succulents Stretch Out in the First Place
Succulents are sun-chasers by nature. In the wild, most of the varieties we grow as houseplants come from rocky, exposed spots where sunlight is intense and unfiltered for most of the day. Indoors, even a bright-looking room usually delivers a fraction of that light, and your plant knows it.
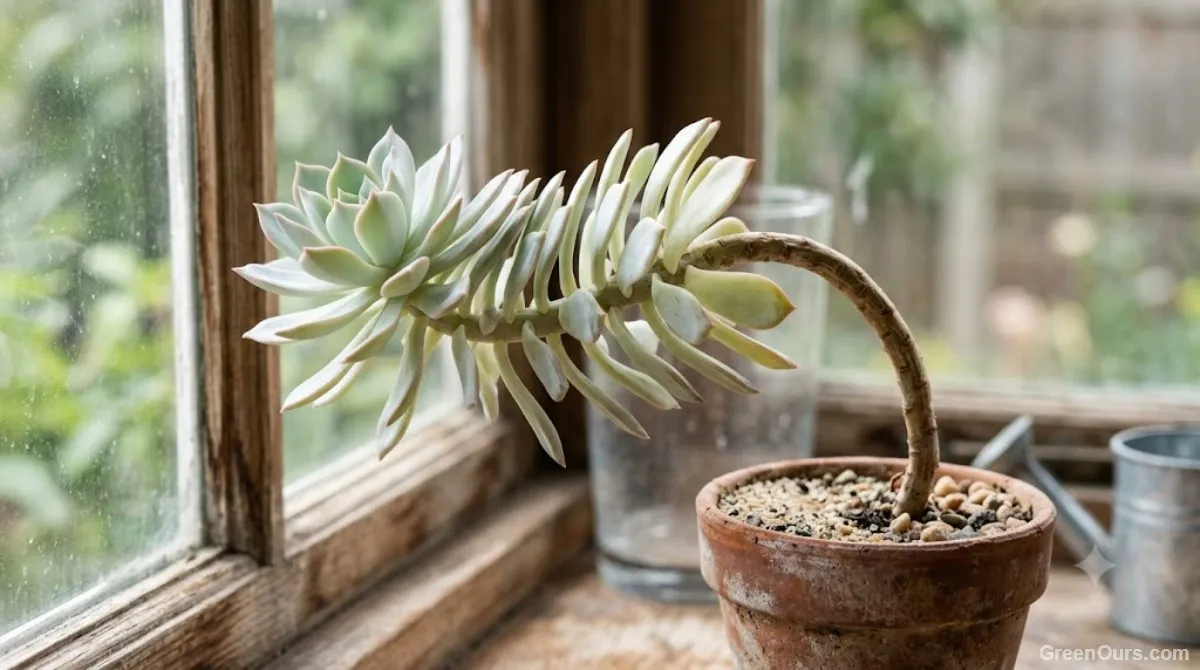
When a succulent doesn't get enough light, it doesn't just sit there quietly getting dimmer. It grows longer stems between each leaf, trying to physically close the distance to a stronger light source. This is what gardeners call "stretching" or, more formally, etiolation. You'll notice the new growth at the top often looks pale or a slightly different shade of green than the older leaves lower down, since it grew in a rush without enough light to develop full color.
The rosette itself usually isn't damaged — it's just sitting at the top of a stem that's grown too long to support it properly. The plant is healthy, it's just in the wrong shape.
How to Tell Etiolation From Normal Growth
Not every succulent that's grown a bit of stem is etiolated, and it helps to know the difference before you start cutting. A few signs point specifically to stretching from low light rather than ordinary growth:
- Noticeably wider gaps between leaves than the plant had when you got it
- New growth that's paler or a different shade of green than older leaves
- The plant leaning hard toward a light source, sometimes almost horizontal
- A stem that looks thin or weak relative to the size of the rosette it's supporting
Some succulent varieties naturally grow a visible stem over time as part of their normal mature shape, so a little height on its own isn't necessarily a problem. If the leaves are still close together, evenly colored, and the plant isn't straining toward the window, it's probably just growing the way it's supposed to.
Give It Better Light Before You Reach for the Scissors
Before you cut anything, move your succulent somewhere brighter. A south- or west-facing windowsill works well for many varieties, though the right spot varies somewhat by species — some succulents tolerate more direct sun than others. If your only bright spot gets harsh afternoon sun, ease the plant into it gradually over a week or two rather than moving it all at once — succulents can sunburn just like we can.
This step matters even though you're about to prune the stretched growth away, because the new growth that follows the cut will only come in compact and full if the light is actually there to support it. Skip this step and you'll likely be dealing with the same leggy problem again in a few months.
Step 1: Cut Back the Stretched Stem
This is the part that feels scary the first time and painless every time after. Using clean, sharp scissors or a small knife, cut the rosette off the top of the stem, leaving an inch or so of bare stem attached to the base.
Where to Make the Cut
Cut just below the lowest set of healthy leaves on the rosette, angling for a clean, single cut rather than sawing back and forth. You want a tidy wound that heals quickly, not a ragged one.
Letting the Cut Callus Over
Set both the cut rosette and the bare stem you left behind somewhere dry and out of direct sun for two to three days. This lets the fresh wounds form a callus, a dry, sealed-over layer that keeps rot and bacteria out once you start the next step. Skipping this and planting or watering right away is one of the most common reasons a cutting fails.
Step 2: Propagate What You've Cut Away
Here's where one sad, stretched succulent quietly becomes several healthy new ones.
Rooting the Rosette
Once the cut end of your rosette has callused, set it on top of dry, well-draining soil rather than burying the stem. Roots typically form and reach down into the soil within a couple of weeks, though timing varies by species and conditions. Mist lightly every few days rather than watering fully until you see new roots taking hold — too much moisture at this stage is more likely to rot the cutting than help it. A rosette cutting has more stored energy than a single leaf, so it generally tolerates this dry stretch better.
Growing New Plants from Fallen Leaves
If any healthy leaves came off during the process, don't toss them. Lay them flat on the surface of dry soil, and leave them alone — leaf cuttings generally need to stay drier for longer than a rosette cutting does, since a single leaf has less stored moisture and rots more easily if watered too soon. Over the next few weeks, tiny roots and a miniature new rosette will often form right at the base of the leaf. Not every leaf will take, and that's completely normal — success rates vary by species, and even a partial success rate will typically leave you with more new succulents than you started with.
What About the Bare Stem You Left Behind?
Leave the original base in its pot and keep it in bright light. It's common for one or more new rosettes to sprout directly from the old stem within a few weeks, giving you a fuller, multi-headed plant instead of the single stretched one you started with. If nothing appears after a month or so, that's alright too — you can compost the old stem once your propagated cuttings are established.
Common Mistakes That Slow Recovery
Watering a fresh cutting before it's callused is the biggest one, and it's an easy one to make when you're eager to get started. Planting cuttings in heavy, moisture-retentive soil is another — succulents recover fastest in a gritty, fast-draining mix. And putting a freshly cut or newly rooted succulent straight into strong direct sun before it's had time to establish roots can scorch leaves that are already under stress.
Patience is really the whole trick here. New roots and new growth on a succulent happen on the plant's own timeline, and checking on a cutting every day won't speed that along — it'll just tempt you to water it too soon.
Explore more beginner succulent care tips
A leggy succulent isn't a plant that's failed you — it's one that's told you exactly what it needs, and now you know how to listen. Give it the light it was asking for, make that one clean cut, and in a few months you'll likely have more succulents on your windowsill than you started with, each one shaped the way it was meant to grow.